Monday, November 6, 2017

RDP over SSH Server 2016

Recently I was tasked with setting up a remote user so that they can access a machine via VPN and then RDP-in. The performance of the Sonicwall SSL VPN has been atrocious over the past few months. The speeds over VPN has been a tenth of the available bandwidth & that can be an issue over relatively slower bandwidths. I have been doing a little research and figured that if I setup OpenSSH server on the windows box then I can setup a SSH tunnel and then RDP over this tunnel. This would be fairly secure in my opinion & would get rid of the atrocious performance by Sonicwall.

While following the suggested steps to get OpenSSH up & running I ran into multiple issues which were specific to running it on windows. I dug into a lot of different sources on the interwebs and was finally able to get this set up. Here's how I did this:
  • Download openssh for windows from github
  • Unzip the files to c:\Program Files\OpenSSH
    • Also, if not present, create a new folder called log within this folder
  • As the Administrator, install SSHD and ssh-agent services:
    powershell.exe -ExecutionPolicy Bypass -File install-sshd.ps1
  • As the Administrator, generate server keys and restrict an access to them, by running the following commands from the C:\Program Files\OpenSSH:
    .\ssh-keygen.exe -A
    powershell.exe -ExecutionPolicy Bypass -File .\FixHostFilePermissions.ps1
  • Open a port for the SSH server on Windows Firewall.
  • Configure the SSHD & SSH Agent Services to start Automatically when windows boots up. (Services > SSHD > Properties > Set start to Automatically & start the service). Make sure that you set the service to restart the service in case of failure.
  • Generate a new public/private key pair using puttygen. You can get puttygen from here
  • After you generate the key, enter the user that will be used to connect to the machine, ex. ojas under "Key comment". The defaults for key type should be good (RSA/2048bit).
  • Copy the key generated in that box and save it in a file, lets call it pubkey.txt. We'll use it later.
  • Save both your private & public keys & keep your private key somewhere safe.
  • On the Server, create a new folder called ".ssh" under c:\Program Files\OpenSSH\ . In this folder create a new file called authorized_keys. Make sure that the permissions on authorized_keys file is as follows:
    • Administrators: Full Control
    • SYSTEM: Full Control
    • sshd: Read
  • Copy the key from pubkey.txt file above to authorized_keys file & make sure that the entire string is in one line! You can add more keys to this file, but make sure that there is only one key per line.
  • Now, we need to configure openssh to use this public key to authenticate instead of password based authentication. To acomplish this, open the sshd_config file, uncomment the following lines and make them look like so:
    • RSAAuthentication yes
    • PubkeyAuthentication yes
    • PasswordAuthentication no
    • PidFile \logs\sshd.pid
  • Restart the service after making changes to the config file.

Connecting from Windows client:

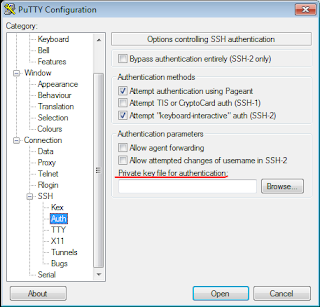
  • From a client, open putty and try to connect to the openssh server that we configured above. To use public key authentication, expand SSH option in the left menu & select Auth. On the right side, click on browse & select your private key for authentication. Once you click on open, you'll be asked for a username & then for a passphrase that you used to protect your private key with.
  • Once you enter the correct passphrase, you should be logged in to the server's command prompt.
  • Now that we have verified that SSH is working, lets create a reverse tunnel that will forward the RDP port from windows 2016 server to your local machine over SSH.
  • To do that, we'll open putty again & as in the previous step, select private key for authentication. Now, to create a tunnel, select Tunnels from the menu on the left & enter values in Source Port & Destination and don't forget to click Add.(see screenshot below)
  • It is very important to understand what this is doing:
    • Destination is the RDP IP/port combination as viewed from the machine you are SSH-ing to. Port 3389(RDP) is open on the windows 2016 machine, & this config defines that we will be forwarding that port over ssh to the Source port on local machine.
    • Source Port is the port that will be opened on the client. If you had the settings as the screenshot above, putty will open a local port 1337 which will be forwarded through this SSH tunnel to port 3389 on the remote machine.
    • You can use any Source port as long as it doesn't conflict with what you are running on the client machine 
  • Once you connect via putty you can RDP to your server by connecting to localhost:1337. 1337 is the same port that we set in Source above.


Connecting from OSX or Linux Client:

Here’s what you need to do from your macbook:

  • Open terminal & type the following command: ssh -L 1337:127.0.0.1:3389 11.2.1.1 -p 22 -l “domain\user” -i /
    • This is essentially ssh-ing to your machine on port 22 & forwarding port 3389(RDP) to a local port 1337. Feel free to change 1337 to whatever you’d like.
    • After you press enter, you’ll be asked for passphrase for the key, type that and press enter.
  • Once the connection is established, you’ll see command prompt. Minimize this window. As long as you have this window open, the SSH tunnel will remain open.
  • Open your remote desktop client & connect to localhost:1337.
  • Login as your user & enjoy RDP access
NOTES:

If you run into issues with the SSH connection, edit the sshd_config file and change LogLevel to DEBUG3 & tail the sshd.log file under log folder.

Saturday, March 18, 2017

Windows 10 -- saved wifi password

Recently I came across an interesting issue. I had to reset my router, and as I was in the process of setting up the SSIDs, I realized that I didn't note down password to one of my 2 wifi networks. I figured that thats not an issue since windows remembers all previously connected wifi passwords. Unfortunately I didn't realize that Windows 10 unlike Windows 7 doesn't show you passwords to past remembered networks via GUI. All I could see was a list of wifi networks that I have connected to in the past. Something like this:


When you click on properties, all you get are options to connect automatically or define it as metered connection.

Now, I was trying to setup the router again giving the second network very restricted access. I wanted to make sure that a few devices that connect to that network can continue to connect to it without me needing to reconfigure their passwords. With some research online I found the following command which shows you saved passwords for any previously connected networks. The networks with a space in them can be passed with quotes surrounding them. Here is an example:

netsh wlan show profile name="Linksys 5" key=clear

Here is the output for one of the networks saved on my machine; the password will be visible under Key Content:


This might come handy again.

_O

Saturday, January 4, 2014

Physical to Virtual migration of Domain Controller


The other day I got a chance to migrate the domain controller to our VMware ESX-based private cloud. Since this was the primary domain controller which was also running DNS, DHCP, Print Server as well as McAfee ePO server it was a critical component to the company. I did some research and followed guidelines found on internet. I followed the steps in the following order:
-          First defragment the hard drive of physical server, which will make the process faster.
-          In the meantime, collect the following data from the physical server which will prove very useful during/after migration.
o   Domain Admin credentials (Since it is domain controller, you cannot get local admin credentials like other servers)
o   A screenshot of Ipconfig /all
o   Current and proposed hardware configuration (vCPU, memory, HDD)
o   If you have vCenter running a cluster, then write down local credentials of one of the servers in the cluster.
-          After defragmentation is finished, open the vCenter Converter and follow these steps:
o   Choose convert machine, and put in the server name and credentials.
o   If you have vCenter running, then type in the vCenter server name and credentials and the select the usual stuff (which server you want to run on/which datastore etc).
o   DON’T CLICK FINISH YET!!! We still need to configure the hard drive. In the left column select the hard drive and give all the partitions its own virtual disk and uncheck any partition that shows up as ‘?’ which is possibly system partition (I’m not for sure). In my case the migration failed the first time at 11% because I had single virtual disk for both partitions and hadn’t unchecked the third partition. Also, in “advanced” make sure that turn on virtual machine when finished is not checked.
o   OPTIONAL: While I did not, you are supposed to turn off relevant services and turn them back on after migration to prevent any hiccups.
o   Now you can click next and finish. (And wait forever and ever for the converter to finish converting)
-          After the conversion has finished don’t turn off the physical machine just yet. First login to the vCenter server and verify that you can see the machine. Go to edit settings and get rid of serial ports or floppy drives (which I hope you aren’t using anyway). Now happily say your old machine good bye.

POST MIGRATION STEPS
-          Turn on the Virtual machine, and let it go through the first boot process. It will delete a bunch of stuff and reconfigure itself.
-          Login to the machine and install VMware tools (and restart).
-          Now from what I have read online, during the conversion process the NICs get deleted but not uninstalled. This means that you have to uninstall them manually before you can configure the new NICs. The instructions follow:
o   Open command prompt and type the following commands in order:
§  set devmgr_show_nonpresent_devices=1
§  start DEVMGMT.MSC 
o   Click ‘View’ and then click ‘Show Hidden Devices’.
o   Expand the Network Adapters tree and right click the dimmed network adapter and click ‘Uninstall’ (You may also see a hidden 'RAS async adapter' device under NICs. This cannot be uninstalled. However, it doesn't matter as it doesn't influence the NIC issue, so just leave it).
-          Using the screenshot you took earlier give your NIC a static IP/DNS server.
-          Verify that services.msc has all the services running.
-          I had a small checklist to make sure that all the crucial services were running after migration:
o   Domain: Can you login from other computer?
o   DHCP: Can you release/renew?
o   DNS: Can you flush DNS and then access websites?
o   McAfee ePO: Can you update policies?
o   Print Server: Can you add a printer to computers?

THE HICCUP
After migration all the other services were running just fine except McAfee ePO. When I tried to access the web console it showed a bunch of errors (at least 25 of them!!). At this point I assumed that the data was corrupt and that I will have to re-install ePO (and cursing to myself, why did I not turn off the McAfee service before migration). The next day before re-installing ePO I tried to restart McAfee services and guess what McAfee started working like it had never seen issues! Lesson learned: Always turn off relevant services before migration.
Hope it helps someone out there!

Tuesday, December 8, 2009

VMware Server v/s ESXi on SATA drive

Hi guys, I was analyzing the performance of ESXi and VMware Server with Windows XP as host as well as guest and came up with an interesting conclusion. The performance of VMware server was wayyyy better than VMware ESXi. I used Passmark Performance Test 7.0 for benchmarking. My analysis is as follows:

Host system was a Pentium 4 2.8 GHz/2GB/80 GB. Windows virtual machine had 512 MB RAM and 8 GB HD. While performing the test no other virtual machines were running. In this test, hard disk read, write, and random seek + RW were measured.The following graph shows clearly the difference between the disk mark of two hypervisors:

The average Disk Mark for this test was 609.68 for VMware Server and 231.22 for VMware ESXi. The reason for this vast difference is unknown, due in large part because there is no official documentation from VMware discussing differences in hard drive access methods between VMware ESXi and VMware Server. I wonder if anyone else came across such a scenario.

Note: One thing to keep in mind is that the scores here are relative, and they have no units.